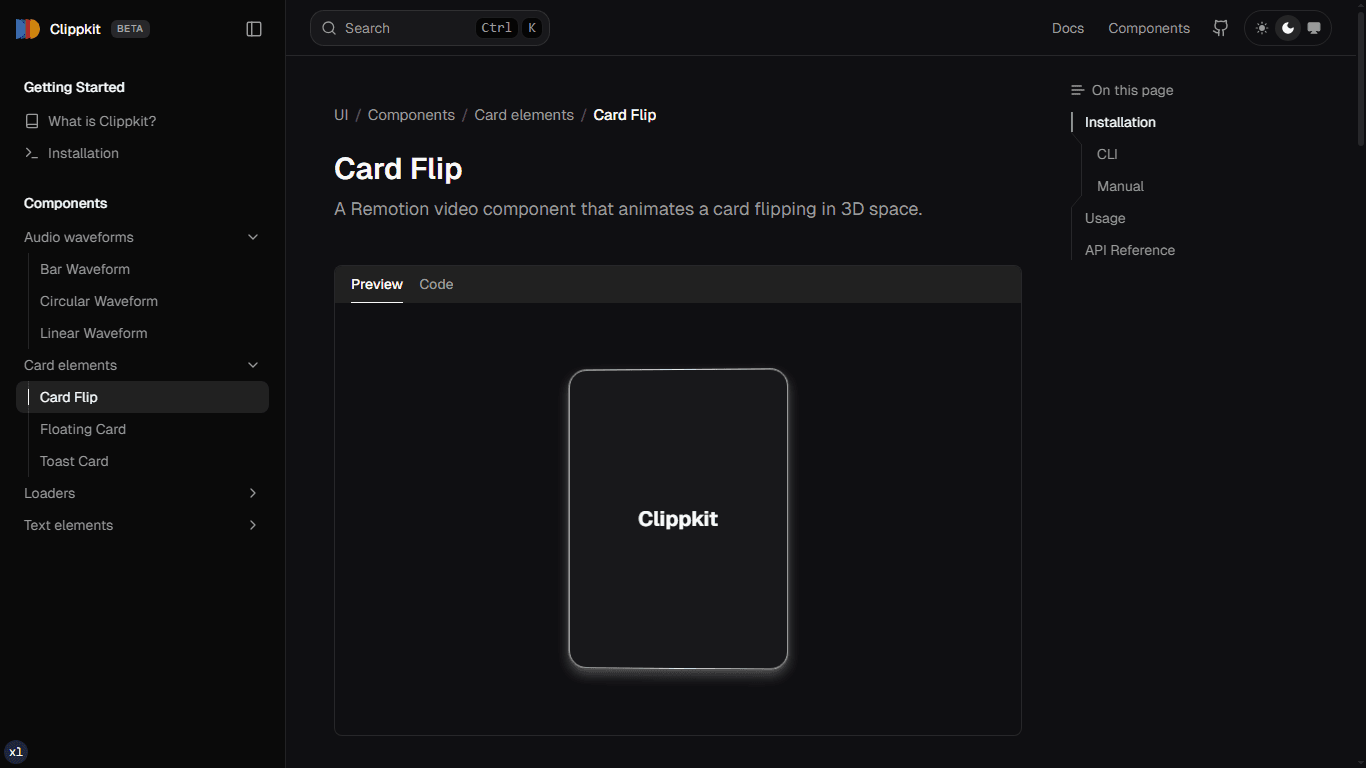
Installation
How to set up dependencies and start using Clippkit in your Remotion project.
What You’ll Need First
Requires a Remotion Project
Clippkit components only work inside a Remotion setup. If you haven’t got one running yet, check out the Remotion getting started guide first.
Installation Methods
You can install Clippkit components in your Remotion project using one of the following methods:
- Using the
shadcn/uiCLI: This is the recommended method for most users. It allows you to easily add components to your project with a single command. - Manual Installation: If you prefer more control over the installation process, you can manually copy the component source code into your project.
Using the shadcn/ui CLI
Setup shadcn/ui CLI
Clippkit utilizes the shadcn/ui CLI to make adding components to your project seamless. Because components are installed directly into your project, you have full control to modify them as needed.
Refer to the shadcn installation guide to configure your project, or run the following command to initialize shadcn:
Configure Component Path (Optional)
By default, components are installed in a components directory. You can customize the installation path by editing the aliases.components value in your components.json file:
This will install all Clippkit components to the src/components/clippkit directory.
Add a Clippkit Components
Once initialized, you can add any Clippkit component by providing its registry URL to the add command:
Manual Installation
You can also manually install components by copying the source code from the Clippkit registry and adding it to your project.
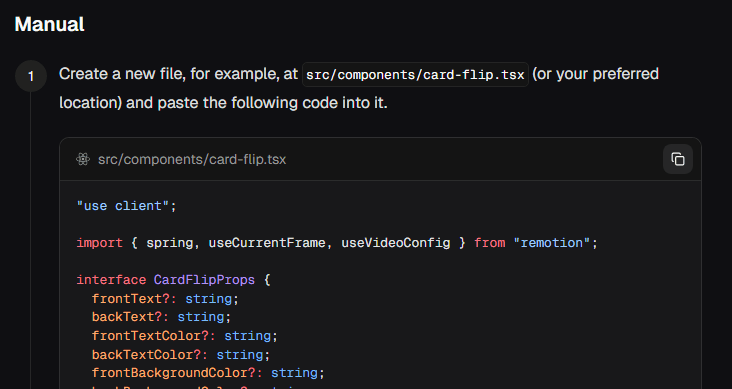
Create a new file
Create a new file in your components directory (e.g., src/components/clippkit/card-flip.tsx).
Paste the source code
Paste the source code into the new file.
Install any dependencies
Install any dependencies that the component requires. You can find the dependencies on the component's page.
This approach is useful if you want to have more control over the installation process or if you want to install components in a project that doesn't use the shadcn/ui CLI.
Next Steps
Once you've installed a component, you can:
- Import it in your Remotion composition.
- Customize the props to match your design.
- Add it to your video timeline.
Check out the individual component pages for detailed usage examples and API documentation.
How Clippkit Works
Clippkit leverages the power of shadcn/ui to provide a seamless experience for adding components to your project. Here's a brief overview of the process:
-
Initialization: When you run
npx shadcn@latest init, it creates acomponents.jsonfile in your project. This file contains configuration forshadcn/ui, including the path to your components folder. -
Adding a Component: When you run
npx shadcn@latest add <component-name>, theshadcn/uiCLI reads yourcomponents.jsonfile to determine where to install the new component. -
Fetching from Registry: The CLI then fetches the component's source code from the Clippkit registry. The registry is a collection of pre-built components that are ready to be used in your Remotion projects.
-
Adding to Your Project: Finally, the CLI adds the component's source code directly to your project. This means you have full control over the code and can modify it to fit your needs.
This approach provides the following benefits:
- Full Control: Since the components are added directly to your project, you can modify them as much as you want.
- No Dependencies: Clippkit components are self-contained and don't add any extra dependencies to your project.
- Easy to Use: The
shadcn/uiCLI makes it easy to add and manage components in your project.
Here is a visual representation of the flow: